"Mastering Basement Framing: A Comprehensive 101 Guide"
Basement Framing 101: A Comprehensive Guide
Embarking on a basement framing project? You're in the right place. This comprehensive guide will walk you through the process, from understanding the basics to mastering the techniques. Let's dive in!
Understanding Basement Framing
Basement framing, also known as foundation framing, is the process of constructing the structural framework of your basement. It's the skeleton that supports your home's weight and provides a stable base for your walls and floors. A well-framed basement ensures a solid, durable, and safe home.
Why Framing Matters
- Structural Integrity: A solid frame prevents settling and shifting, keeping your home level and safe.
- Energy Efficiency: Proper framing ensures your insulation works effectively, saving you money on heating and cooling.
- Future-Proofing: A well-framed basement makes it easier and more affordable to finish or renovate in the future.
Tools and Materials for Basement Framing
Before you start, ensure you have the right tools and materials. Here's a list to get you started:


| Tools | Materials |
|---|---|
| Tape measure Level Circular saw Hammer Nails Drill Safety gear (gloves, glasses, ear protection) |
Lumber (2x4, 2x6, 4x4, etc.) Concrete screws Concrete anchors Concrete drill bit Concrete sealer Insulation (foam boards, fiberglass, etc.) |
Steps to Framing a Basement
Now that you're equipped, let's get into the framing process. Here are the steps:
1. Layout and Planning
Measure and mark your layout on the concrete floor. This includes wall locations, doorways, and any other openings. Use a level to ensure your layout is square and plumb.


2. Anchor the Sill Plate
The sill plate is the bottom layer of your frame, resting directly on the concrete. Use concrete screws or anchors to secure it in place. Ensure it's level and square.
3. Build the Walls
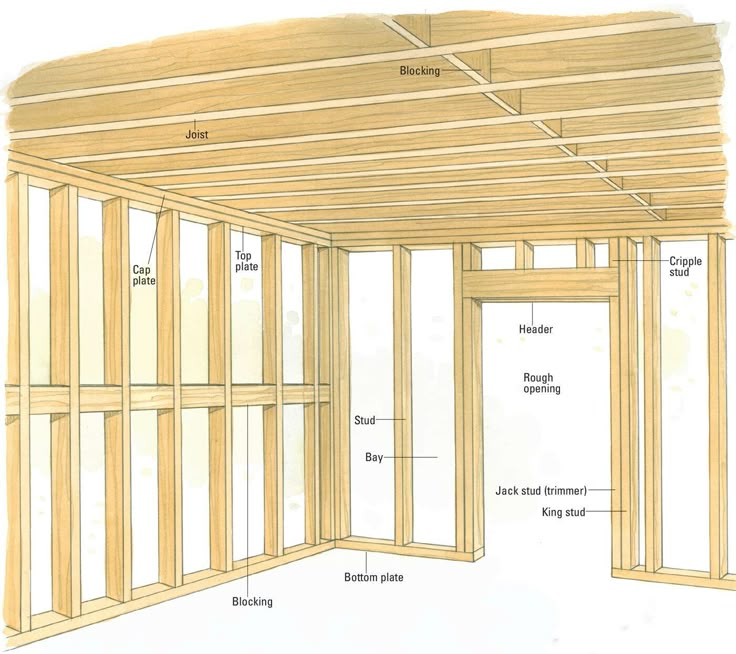
Start by attaching the bottom plate to the sill plate. Then, build up your walls using studs spaced 16 or 24 inches apart. Use a level to ensure each stud is plumb and the wall is square.
4. Install Top Plates and Sill Plates
Once your walls reach the desired height, install the top plates. Then, install the sill plates for the next level of your home (if applicable). Ensure everything is level and square.


5. Install Windows and Doors
Measure and cut openings for windows and doors. Install them using the manufacturer's instructions. Ensure they're level, plumb, and square.
6. Insulate and Seal
Insulate your basement walls to improve energy efficiency. Seal any cracks or gaps in the concrete to prevent moisture and pests.
Tips for a Successful Basement Framing Project
- Always check local building codes and obtain any necessary permits before starting.
- Wear safety gear to protect yourself from injuries.
- Take your time. Rushing can lead to mistakes that are costly to fix.
- Don't skimp on materials. Using high-quality lumber and insulation ensures a solid, durable frame.
Basement framing is a critical step in home construction. With the right knowledge and tools, you can frame a basement that's solid, safe, and ready for the future. Happy building!




Related Articles

"Mastering Basement Wall Framing: A Comprehensive Guide"
Mastering Basement Wall Framing: A Comprehensive Guide Embarking on a basement renovation project? One of the most critical steps is framing the walls...
"Mastering Basement Wall Framing: A Comprehensive Guide"
Understanding Frame Basement Walls: Construction, Benefits, and Maintenance Frame basement walls, also known as wood-framed or stick-built basement walls, are...
"Mastering Basement Wall Framing: A Comprehensive Beginner's Guide"
Mastering Basement Wall Framing: A Comprehensive Guide Embarking on a basement wall framing project can seem daunting, but with the right knowledge and tools...

"Mastering Basement Window Framing: A Comprehensive Guide"
Embarking on a basement window framing project? You're in the right place. We'll guide you through the process, from understanding the types of basement...

"Mastering Basement Bathroom Rough-In Plumbing: A Comprehensive Guide"
When planning a basement bathroom, one of the earliest and most crucial steps is the rough-in plumbing. This phase involves installing the pipes and drains...
"Mastering Basement Bathroom Rough-Ins: A Comprehensive Guide"
Planning a Basement Bathroom: A Comprehensive Guide to Rough-In Embarking on a basement bathroom project? You're not alone. Basement bathrooms are a popular...